This guide explains how to download, install, and use the Cloudss client on your Android phone or tablet.
1. Download and Install
-
Click the link below to download the Cloudss Android installation file:
-
After the download is complete, open the APK file to start installation.
-
If Android asks for permission to Install unknown apps, please allow it and continue the installation.
-
After installation is complete, find the Cloudss icon on your home screen or in the app drawer.
Note:
Android may show a security warning when installing an APK file. Please make sure you downloaded the APK from the official link above, then continue the installation.
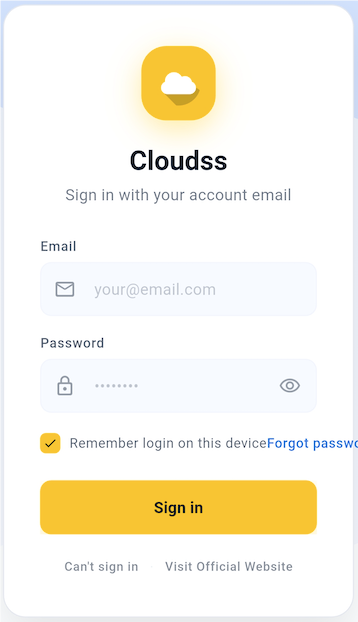
2. Log In to Your Account
-
Open the Cloudss app.
-
On the login screen, enter the email address and password you registered on our website.
-
You may enable Remember login on this device so that you do not need to log in again next time.
-
Tap Login to enter the app.
-
If you forgot your password, tap Forgot password and follow the instructions to reset it.
-
If you cannot log in, tap Can't log in or Visit official website to get support.
3. Select a Node and Enable the Proxy
-
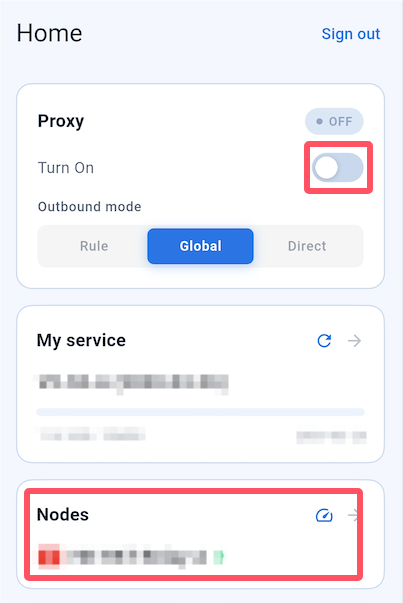
After logging in successfully, go to the Cloudss home screen.
-
Tap Node Selection.
-
Choose any available node from the node list.
-
Return to the home screen after selecting a node.
-
Find the Proxy Control section and tap the switch to enable the proxy.
-
Once the connection is successful, a VPN icon will appear in the status bar at the top of your phone.
4. Grant VPN Permission
The first time you enable the proxy, Android will show a VPN connection request.
Example system prompt:
Cloudss wants to set up a VPN connection. This connection may be used to route network traffic. Only accept this request if you trust the app.
-
When the VPN connection request appears, tap OK.
-
After permission is granted, Cloudss can establish the proxy connection normally.
-
If you do not grant VPN permission, the proxy feature will not work.

Note:
It is normal for Android to show a VPN connection request. Cloudss uses VPN mode to create a local proxy connection. Please tap OK to authorize it.
5. Select an Outbound Mode
On the Cloudss home screen, you can choose an Outbound Mode. The available modes are:
-
Rule Mode Recommended: Automatically decides which traffic uses the proxy based on preset routing rules. This mode is recommended for most users.
-
Global Mode: All network traffic will go through the selected VPN node.
-
Direct Mode: The proxy is not used, and all traffic connects directly to the internet.
Recommendation:
For daily use, we recommend selecting Rule Mode. It provides a better balance between usability and connection efficiency.
6. Update Service and Node Information
You should update your service information if:
- You purchased a new plan
- You renewed your service
- You need to refresh the node list
- Your plan expiration date or traffic information has not updated
-
Return to the Cloudss home screen.
-
Find the My Service card and tap Update.
-
After the update is complete, you can view the latest plan information, including expiration date, available traffic, and updated node configurations.

7. Test the Connection
-
Make sure the proxy is enabled and the VPN icon appears in the status bar.
-
Open your mobile browser and test access to the websites you need.
-
You can also open other apps to check whether network services are working normally.
Frequently Asked Questions
1. What should I do if Android warns me about installing an unknown app?
This is a normal Android warning for APK files installed outside the app store. Please make sure you downloaded the file from the official link in this guide, then allow the installation.
2. Which account should I use to log in?
Please log in with the account you registered on our website, using your email address and password.
3. What should I do if a VPN connection request appears?
Please tap OK. Cloudss needs to use VPN mode to create a local proxy connection. This is a normal Android permission request.
4. Why does a VPN icon appear at the top of my phone?
The VPN icon means Cloudss has successfully created a proxy connection. This is normal.
5. Which outbound mode should I choose?
For most users, we recommend using Rule Mode. It automatically routes traffic based on preset rules and is suitable for daily use.
6. What should I do if my plan or node information is not updated?
Please tap Update in the My Service card on the Cloudss home screen. After the update is complete, the latest plan and node information will be loaded.
After completing the steps above, you can use the Cloudss client normally on Android.